If you’re one of the millions of website owners who want to know how to add keywords in WordPress without plugins, then this guide is for you.
What you’ll find below are step-by-step instructions for how to automatically add keywords in WordPress using PHP code and ways to manually add keywords to WordPress with custom fields. By the end of this guide, you’ll know how to create and insert keywords into custom meta tags and images so you can work to improve your website’s search engine optimization (SEO).
For some reason, the WordPress content management system (CMS) doesn’t have built-in support for adding SEO keywords to certain HTML fields that are important to search engine optimization, which is why so many third-party plugins have been developed for this purpose. However, you don’t need to install another WordPress plugin to enable a keyword optimization feature as you’ll soon find out in this instructional guide.
How to Add Keywords In WordPress Without Plugins
1. Open the WordPress Themes Folder
The first step for how to add keywords in WordPress without plugins can be done in two ways:
- Using the WordPress Dashboard: Go to Appearance > Theme Editor
- Using the File On the Web Server: Go to
wp-content/themesfolder and browse through the folder to find the theme currently being used. Then open that folder to display the list of files.
2. Find and Open the functions.php File
Inside the WordPress dashboard Theme Editor or on the web server, find and open the functions.php file.
According to WordPress.org, “The functions.php file is where you add unique features to your WordPress theme. It can be used to hook into the core functions of WordPress to make your theme more modular, extensible, and functional.”
Basically, functions.php file is a template included in all WordPress themes. And it works like a plugin for your WordPress website that’s automatically activated with your current theme.
In this case, you’ll be using the functions.php file to add keywords to a WordPress site without using a plugin from a third-party developer.
3. Add The Following Code to the functions.php File
After you open the functions.php, the next step is to add PHP code that performs the task of creating the proper HTML meta tags for your WordPress site:
- Meta description tag
- Meta keywords tag
To do this, copy the PHP code from the below box and paste it at the end of the functions.php file.
function add_meta_tags() {
global $post;
if ( is_single() ) {
$meta = strip_tags( $post->post_content );
$meta = strip_shortcodes( $post->post_content );
$meta = str_replace( array("\n", "\r", "\t"), ' ', $meta );
$meta = substr( $meta, 0, 160 );
$keywords = get_the_category( $post->ID );
$metakeywords = '';
foreach ( $keywords as $keyword ) {
$metakeywords .= $keyword->cat_name . ", ";
}
echo '
<meta name="description" content="' . $meta . '" />' . "\n";
echo '
<meta name="keywords" content="' . $metakeywords . '" />' . "\n";
}
}
add_action( 'wp_head', 'add_meta_tags' , 2 );
This Is How the Above PHP Code Works:
- It makes the process of adding keywords to your pages and posts automatic.
- It fetches 160 characters from the first paragraph of any post and page and displays it as the meta description.
- It fetches the post or page category and displays it as the meta keywords.
Therefore, you’ll want to make sure that your most important keywords are within the first 160 characters of your content. Otherwise, those keywords will not be shown in the meta description HTML tag in Google’s search engine results pages (SERPs).
As for the meta keywords, using this process will not allow you to add more than one keyword into this HTML field. To get two or more keywords listed, check out the next section of this guide on “How Do I Manually Add Keywords to WordPress”. It will teach you how to do this with custom fields for each post and page.
But just know that meta keywords are not that important for SEO anymore, so you don’t have to worry about adding more than one keyword into this HTML field. See my post on what are meta keywords in SEO for more details on this topic.
4. Save the functions.php File
After you’ve pasted the correct PHP code into the functions.php file, you’re done with this WordPress customization.
All you have to do now is save the functions.php file for the updates to be stored in the WordPress database.
5. Refresh the WordPress Site
The final step to adding keywords to WordPress without plugins is to check your work and see the changes taking place on the live website.
To do that, go to a web page and then refresh it to clear the cache.
Then check the HTML source code using the keyboard command ctrl + u on most web browsers to find the meta description and meta keywords being displayed in the <head> section of the web page.
NOTE: If you want more manual control over your keywords in WordPress for the meta tags, then the next section can help. It will show you how to use the custom fields feature in WordPress to manually add custom meta descriptions and meta keywords into any page or post on the website. If you want to learn how to use keywords in an article for SEO, I have a separate step-by-step guide for that topic.

How Do I Manually Add Keywords In WordPress?
1. Create A New Post or Open an Existing Post
Login to your WordPress dashboard, then create a new post or open an existing post to which you want to add a meta description or meta keywords tag.
2. Turn On the Custom Fields Option
According to WordPress.org, “WordPress has the ability to allow post authors to assign custom fields to a post. This arbitrary extra information is known as metadata.” And it’s the perfect solution for adding keywords to a WordPress site without using plugins.
However, the WordPress custom fields option will not be turned on by default. So you need to fix this to add your keywords to the correct meta tag fields.
Here’s the list of steps for turning on the custom fields feature:
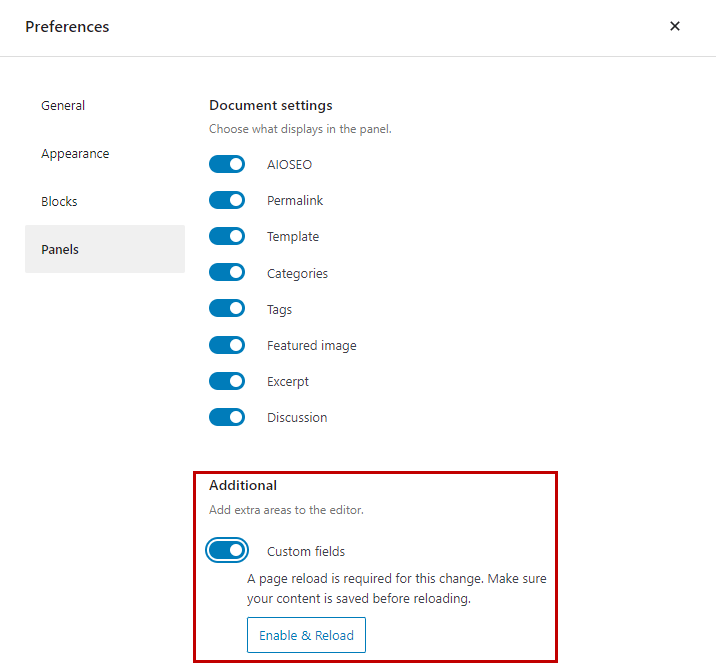
- At the top right of your WordPress dashboard, you should see three dots. Click on those dots to open the WordPress options menu.
- In the pop-up screen for Preferences, click on the “Panel” tab located on the left-hand side.
- Under the “Additional” section, click on the “Custom Fields” toggle bar to toggle it to the on position. A page reload is required for this change. Make sure your content is saved before reloading. Then, click on the “Enable and Reload” button that appears.
- After the page reloads, a “Custom Fields” section will appear below your WordPress text editor.
Here’s an image showing the “Custom Fields” section in the Preferences pop-up box:

3. Create A Custom Field for Meta Keywords
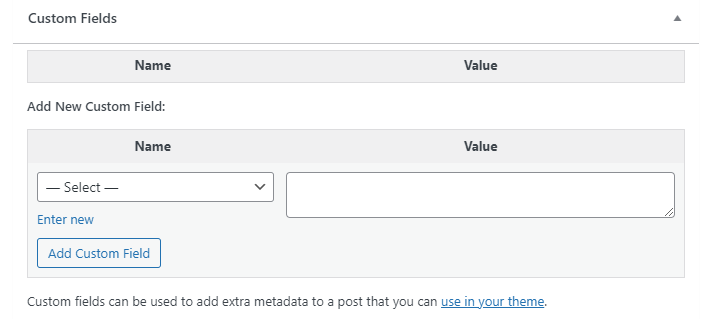
Scroll down past the bottom of the WordPress text editor to the new “Custom Fields” section that was enabled in the previous step of this guide.
You should now see an “Add New Custom Field” area.
Here’s how you create the custom field for meta keywords:
- Under the “Name” column, click on “Enter New” which is located below the “- Select -” dropdown menu.
- In the text field that now appears under the “Name” column, type in “keywords”. This will assign a custom field for the meta keywords.
- In the text field under the “Value” column, type in the keywords you want to be displayed in the meta keywords HTML tag with commas separating each phrase.
- Click on the “Add Custom Field” button to save this new custom field for the meta keywords.
Here’s an image showing the main “Custom Fields” section in WordPress:

Here’s an image showing the process for adding data into the meta keywords “Name” and “Value” fields:

4. Create A Custom Field for Meta Description
You’ll repeat the same process as listed in step 5 to create the meta description information.
However, this time you’ll put the word “description” in the “Name” column and your custom meta description information in the “Value” column.
After you’re done with that task, click on the “Add Custom Field” button to save this new custom field for the meta description.
Here’s an image showing the process for adding data into the meta description “Name” and “Value” fields:

5. Open the WordPress Theme’s functions.php File
The next step for manually adding keywords in WordPress is to create a function that calls the custom fields you created in the previous two steps and outputs the metadata in the <head> section of the website.
To do this, you first need to open the theme’s functions.php file.
This can be done in one of two ways:
- Using the WordPress Dashboard: Go to Appearance > Theme Editor >
functions.php - Using the File On the Web Server: Go to
wp-content/themesfolder and browse through the folder to find the theme currently being used. Then open that folder and edit thefunctions.phpfile.
6. Add A Function to Call Each Custom Field
After you’ve opened the WordPress theme’s functions.php file, add the following two PHP code blocks to it:
Meta Description PHP Code
/*Display custom meta description or the post excerpt */
function add_custom_meta_des(){

#Homepage Meta Description
if( is_home() || is_front_page() ){
	$meta_des = "Enter your homepage meta description here"; #Edit here
	echo '<meta name="description" content="' . $meta_des . '" />';
}

#Single Page Meta Description
if( is_single() ){
	$des = get_post_meta( get_the_id(), 'description', true);
	if( ! empty( $des )  ){
		$meta_des = esc_html($des);
		echo '<meta name="description" content="' . $meta_des . '" />';
	}
}}
add_action( 'wp_head', 'add_custom_meta_des', 4 );
Meta Keywords PHP Code
/*Display custom meta keywords or the post excerpt */
function add_custom_meta_key(){

#Homepage Meta Description
if( is_home() || is_front_page() ){
	$meta_key = "Enter your homepage meta keywords here with a comma separating each phrase"; #Edit here
	echo '<meta name="keywords" content="' . $meta_key . '" />';
}

#Single Page Meta Description
if( is_single() ){
	$key = get_post_meta( get_the_id(), 'keywords', true);
	if( ! empty( $key )  ){
		$meta_key = esc_html($key);
		echo '<meta name="keywords" content="' . $meta_key . '" />';
	}
}}
add_action( 'wp_head', 'add_custom_meta_key', 4 );
This Is How the Above PHP Codes Work:
- The first line of the code in each example checks if the current page is the homepage, and if it is true, then the custom meta keywords or meta description entered in the code will be displayed in the HTML output.
- If the current page is not the homepage, the code checks if the page is a single post page, and if it is true, then it checks if the page has a custom field named “keywords” or “description” and outputs the custom field data if present. If not present, it outputs nothing.
7. Save the functions.php File
After you’ve pasted the above PHP code blocks into the functions.php file, you’re done with this WordPress customization.
All you have to do now is save the functions.php file for the updates to be stored in the WordPress database.
8. Reload the WordPress Page
The final step to manually adding keywords in WordPress without plugins is to check your work and see the changes taking place on the live web page.
To do that, go to the web page you entered created the custom fields for, and then refresh it to clear the cache.
Next, check the HTML source code using the keyboard command ctrl + u on most web browsers to find the meta description and meta keywords being displayed in the <head> section of the web page.
How Do I Add Keywords to an Image In WordPress?
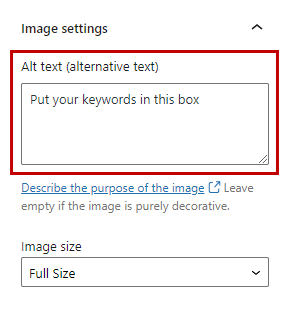
To add keywords to an image in WordPress you need to click on the image in the post to bring up the block editor. Next, add the keywords in the ALT text box. This alternative text will be scanned by search engine crawlers to identify WordPress image keywords.

One thing to keep in mind here is that the ALT text field is also used by screen readers to help people with disabilities understand the content within the image. Therefore, you should not just use the image ALT text box to stuff your keywords in WordPress.
Instead, use this HTML field to properly describe the image while also including your main target keywords naturally in the text.
Other Ways to Add Keywords to WordPress
Adding keywords to the meta tags and image ALT text is not the only way you can optimize a WordPress website for SEO. There are also a number of other places where you can put keywords on each web page that don’t require plugins.
In fact, you can just insert keywords on the page using plain text to improve the on-page SEO for the content in the following areas:
- Page title (also known as the meta title)
- Headings (H1 to H6)
- Body content
- Internal link anchor text
You can also take things a step further by optimizing these locations for keywords:
- Page name URL
- Image filenames
- Image metadata
- Navigation menu text
- HTML title attributes
See my guide on what is on-page SEO for more details on optimizing these locations for search engines like Google, Yahoo, and Bing. Additionally, if you’re wondering, “Do WordPress tags help SEO?”, then check out that linked page for the answer. It’s a common question WordPress users have about improving the optimization of their content with the tags feature.
Summary for How to Add Keywords In WordPress Without Plugins
I hope you enjoyed this guide on how to add keywords in WordPress without plugins.
As you discovered, there are two ways for how to manually add keywords to WordPress for the meta tags. The first way includes automatically pulling the keyword data from the WordPress post content and category data. The second method is to create custom fields that allow you to write custom meta tags for each web page to optimize it in the most effective manner for SEO purposes. As for adding keywords to images, this can simply be done with the block editor in the WordPress post as well as adding those target phrases into the content itself with plain text.

SEO Chatter is dedicated to teaching the fundamentals of search engine marketing to help marketers understand how to increase organic website traffic and improve search engine rankings.

