In this article, you’ll learn how to add backlinks in WordPress.
There are two types of backlinks that can be added to a WordPress site: dofollow and nofollow links. This step-by-step guide will teach you how to create both of those backlinks so you can add the right kind of links to your content.
How to Add Backlinks In WordPress
1. Log Into WordPress
The first step for how to add backlinks in WordPress is to log into the content management system (CMS) through the /wp-admin/ page on your website’s domain.
2. Open a Blog Post or Page
After you’re logged into your WordPress site, you need to open an existing blog post or page (or create a new one) that you want to add a backlink to.
3. Highlight the Text to Add a Backlink to
Next, you need to highlight the text inside the Gutenberg content editor where you want to place a backlink. To do this, you need to follow these three steps:
- Left-click and hold your mouse down before the first letter in the first word you want to use for the backlink.
- Drag your mouse to the right while still holding down the button to highlight all of the words you want to use in the backlink anchor text in blue.
- Release the button on your mouse after the last letter in the last word for the anchor text.
Here’s an example image with the text highlighted in blue to insert a backlink:

4. Add the Backlink URL
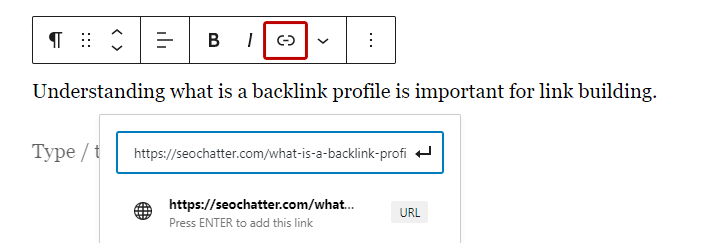
At this stage, the text inside your WordPress blog post or page will be highlighted in blue. You then want to click on the link icon to bring up the hyperlink field.
Next, you want to paste the URL for the backlink into the hyperlink field to insert it as a link.
Here’s an example image of that process being performed with a red box outlining the link icon. Also, notice how the blue highlighting goes away. That is normal and the highlighted text will still receive the hyperlink.
5. Choose the Correct REL Attribute
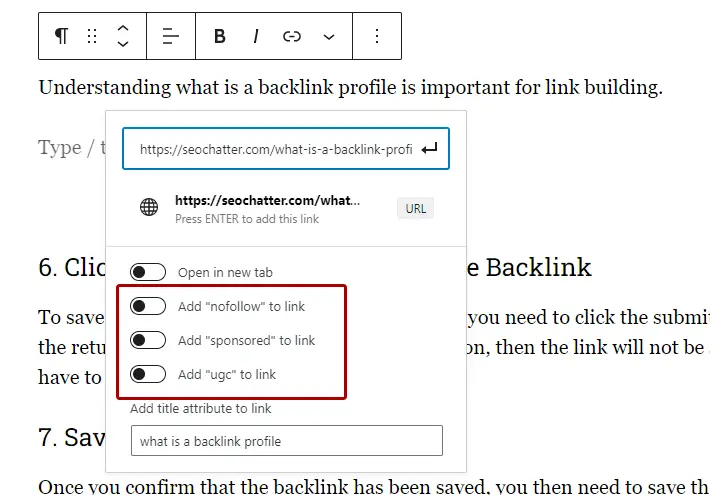
After the URL has been pasted, the next step is to choose the correct REL attribute, which defines the relationship between a linked resource and the current document.
If you choose nothing, then the backlink will become a dofollow link that passes PageRank value to the target URL.
If you choose to turn on any of the following REL attributes, then the backlink will be a nofollow link and search engines like Google may decide not to pass PageRank value. (Nofollow attributes are a hint and not a directive.)
- Add “nofollow” to link (for general links you don’t want to pass PageRank to)
- Add “sponsored” to link (for affiliate and advertisement links)
- Add “ugc” to link (for user generated content links)
Here’s an example image with those options surrounded with a red box so you know how they can be turned on or off:
6. Click the Submit Button to Save the Backlink
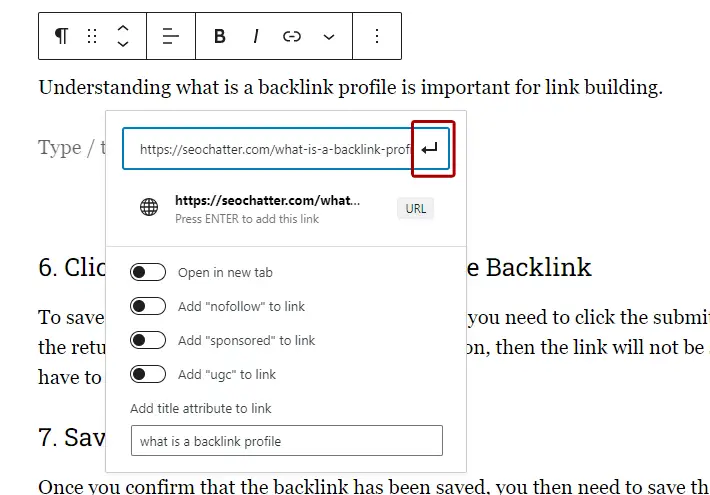
To save the newly added backlink in WordPress, you need to click the submit button which is the return arrow icon. If you don’t click this button, then the link will not be saved and you’ll have to repeat steps 3-5 again.
Here’s an example image with the submit button outlined in a red box so you know where to click to save the inserted backlink:
And here’s the final result of how it would look on your blog post or page for the visitor to see and Google to crawl:
“Understanding what is a backlink profile is important for link building.”
7. Save the Blog Post or Page
Once you confirm that the backlink has been saved, you then need to save the blog post or page for it to take effect on the website.
If you’re editing an existing blog post or page, you’ll want to click on the “Update” button. If you’re creating a new article, then you’ll want to click on the “Publish” button.
8. Repeat to Add More Backlinks In WordPress
You can add as many backlinks as you want to the content in a WordPress site. To make more than one backlink on a page, just repeat steps 3-7 so the changes take effect o the live site.
Adding Backlinks In WordPress Summary
I hope you enjoyed this guide on how to add backlinks in WordPress.
As you discovered, the process for adding backlinks to a WordPress site is quite simple. All you have to do is highlight the text you want to turn into a backlink, add in the URL, and then choose the type of link you want it to be: dofollow vs nofollow link. Once that’s all complete, you simply save the page for the backlink to take effect on the live WordPress site.

SEO Chatter is dedicated to teaching the fundamentals of search engine marketing to help marketers understand how to increase organic website traffic and improve search engine rankings.